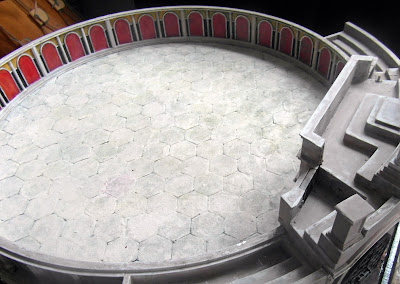
As can be seen fro the photographs I did decide to go with colouring-in the inside walls, as if they had been plastered and painted, rather than just leaving them as 'stone'.
I quite like the overall effect, it does brighten the whole thing up and there is some (though very little) archaeological evidence that the walls of the many arenas may have been painted.
I went with with the most prevalent colours that I could find, that are in evidence. Namely a rosy-pastel red, yellow ochre, white and black. I could just as easily have plumped for a pastel blue too as that is in much evidence on buildings too.
The six columns and arch feature has had the 'flaming' bowls removed from the Playmobil model and the top filled with foamboard and filler. I also added a small dais to the central platform, again out of foamboard, whilst the two plinths on either side of the columns have been 'capped off' with some plastic card to hide the hole that was left from the removal of the Playmobil figure that was meant to stand there.
 |
| One of the two 'side' plinths |
 |
| Photo showing the beading and baseboard |
I surrounded the foam with some 6mm quarter-round beading to protect it, consequently leaving a 1mm edge showing. To compensate for this I've filled the entire outside area of the arena with cheap Poindlandworld ready-mix filler, (including the areas under the arches, but not the 'animal pens').
The photograph on the right shows (poorly) the transition from the main arena entrance to the 'outside' and just how tight the model is to the edges of the foam baseboard. It also just about shows the nicely rounded edge to the baseboard proper, (thanks go to #2 son and his router for that addition).
The baseboard had been given a quick gloss spray undercoat in the initial stages of this build, but I gave it another much needed coat using Humbrol gloss black enamel to clearly define it. Various brown etc. were used for the outside of the arena as the base colour, but these all need a lighter highlight rather than be left as the muddy morass it appears at the moment. There are also one or two other areas that need touching up paint-wise, but nothing too dramatic; the arena 'as-is' is ready to from my point of view!
 |
| Statue and 'drape' |
The first feature is a statue, which I was always going to include ands what the dais was originally intended for. I picked up a very suitable plastic model from ebay (use the search Safari Rome in Toys and Games to find similar items). I think it looks OK, but for the fact that its coloured! Whilst I believe the Romans (and other civilised peoples at the time) used to colour their statues, we're so used to seeing them as bare stone that I should re-paint it as such; currently I'm undecided.
The second feature which I'm considering adding to the model is the addition of some 'banners' for want of a better word, draped over the balustrade of the podium. This would be a simple addition, using some embroidery ribbon material supplied to the cause by my daughter and cut to length. As the ribbon is gold and purple I thought it very fitting and would add yet another bit of colour to an otherwise fairly drab feature of the model.
Finally here a rather blurry photograph of the whole thing from above intended to show that it just fits on my 3 foot square dining table, without the leaves extended, but the leaves will be used for all the figures, dice-rolling paperwork etc.
As the base-board is so substantial I've also thought of mounting it on its own removable legs, maybe at coffee-table sort of height, but those thoughts are currently merely that - thoughts.
In the meantime I do have some stick-on table protectors to affix to the baseboard.
If you're following this project I do hope finding something of interest from it, but that's all for this week.


That is a splendid piece of work Joe! The statue's great as is, I think; how tall is it though?
ReplyDeleteIf you do go for removable legs, I've seen legs you could use in B&Q
And I am following this project and am finding it very interesting - please keep posting!
Thanks Colin ( on all fronts). The staute stands about 60mm tall and the overall height, to the top of the arches s about 12".
ReplyDeleteI've still a bit more to do on the arena, but next time I'll be posting about other stuff I've done for this project .
Cool - looking forward to it!
DeleteBrilliant Joe its coming all together nicely.
ReplyDeleteThanks Brummie, I'm quite pleased with the 'final' effect.
DeleteAwesome!
ReplyDeleteThanks Tito, much appreciated
DeleteNice painting. I really like the colors.
ReplyDeleteThanks Uku, much appreciated
DeleteZabadak is Latin for terrain building god. This is the best arena I've ever seen.
ReplyDeleteThanks BF, I can't take all the credit fot it though. I goy theidea from THe Lead Adv. Forum originally.
DeleteAn outstanding piece of work there matey. Great.
ReplyDeleteThanks Irqan, nych appreciated
Delete