Monday 29 February 2016

Retia

I finally got around to finishing off my retiarii by affixing the nets (the Retia of the title) to the
Onion mesh bag cut into suitable sizes ;circles'
figures. They have been painted for a while now after many changes in colour choices. I'm quite happy with the overall effect I've achieved by using so many different colours (three different browns, two greens and yellow ochre.
Originally I had made the nets to roughly circular scale 4 metres diameter (about 4 inches or 10cm), as my best research seemed to indicate. bebut found that when adding them to the figure they occupied far to much space, especially as I had to really fit them into the 3cm sided hexes I use.
Retiarius with net added
I therefore cut them down to a more practical size of about 3inches which suited me far better.
The attachment was very straight-forward in that I looped one hole in the net over the hand of the retiarius and glued  in place. The remainder of the net was then draped either around his had (if it was one of the gathered ends)  to represent the retrieval rope for a cast net or on the ground by his left side. spots of superglue on both the net and firmly attached the net both to itself and the base, finishing off the figure.
Same figure, different view
And again
Another 'net-man'

I did make an extra net to represent a discarded one, but haven't based it up yet (along with all the other detritus of the arena that still needs doing - i.e. weapons and shields); and that as they say is with these figures now 'finished',  my Gladiator project is all but finished.
And another different one...
...who has probably the most dynamic pose
The final one named "Blurius"


There are a few bits and pieces still to do of course, like the aforementioned detritus and a few counters too are needed.


I also have other, fairly suitable figures that may make an appearance in my arena and some animals too, so I will be still adding to the collection but not at the same rate as this last year and as they are added I will of course post about them.

Thanks for taking the time to visit here and I hope you've found something of interest.

Monday 15 February 2016

Lights

"Red" sword and spear
I have managed to finish off the Carthaginian light infantry "conversions" that I posted about last
time; lack of enthusiasm, time and illness have all lead to my very slow output since pre-xmas and
I'm finding it increasingly difficult to produce anything  - I blame my age !

Although initially I was going to use the same format as my other pairs of figures, but I went this time with colour co-ordinated tunics , but as I was unhappy with the resultsI only managed two pairs  like this, the other two pairs being in white with some colour to denote their pairing with their sword/spear version.


"Yellow"
I wanted to have some fairly drab colours for the tunics and wnet for a dull red and a basic yellow ochre , although the shields on the "yellow" paring are in facte several different washes of brown (probably not that evident from the photographs).


"Team Green"

The blue and green pairs each were given a stripe of their allotted colour around the base of their tunic in addition to their shield colouring.


The whole group


I did discover that there is only so much you can do with 'converting' these figures (at least at the level of conversion I'm talking about) and some of the sword-arm poses s look a bit suspect, but what the heck, as I've said before these are merely playing pieces in my own elaborate version of a board game,  

Thanks for taking the time to visit, I hope you found something of interest.

Next time (note maybe not next week), I may even get around to fixing those nexts to my retiarii figures!

Monday 1 February 2016

"Conversions"

HaT box front
I don't really know if what I'm doing to my figures really qulifies as converting them as I'm mostly just re-purposing and adjusting their stances.
My latest efforts in press-ganging figures comes from the HaT box (*smirk) 9120 - Carthaginian Light Infantry (as shown)
As usual there are four sprues each of four different figures in the box.
This was my first HaT box of 54mms that I bought and came from a fairly local model shop for the princely sum of £4.50 (less than 30p a figure!).
Rear box art
Unlike the newer box art of a single figure , this older version features an artists impression of the four figures in the box, whilst the reverse shows line drawings of figures within and a' painting guide' .
Opening the box is where reality clashes with artistry,
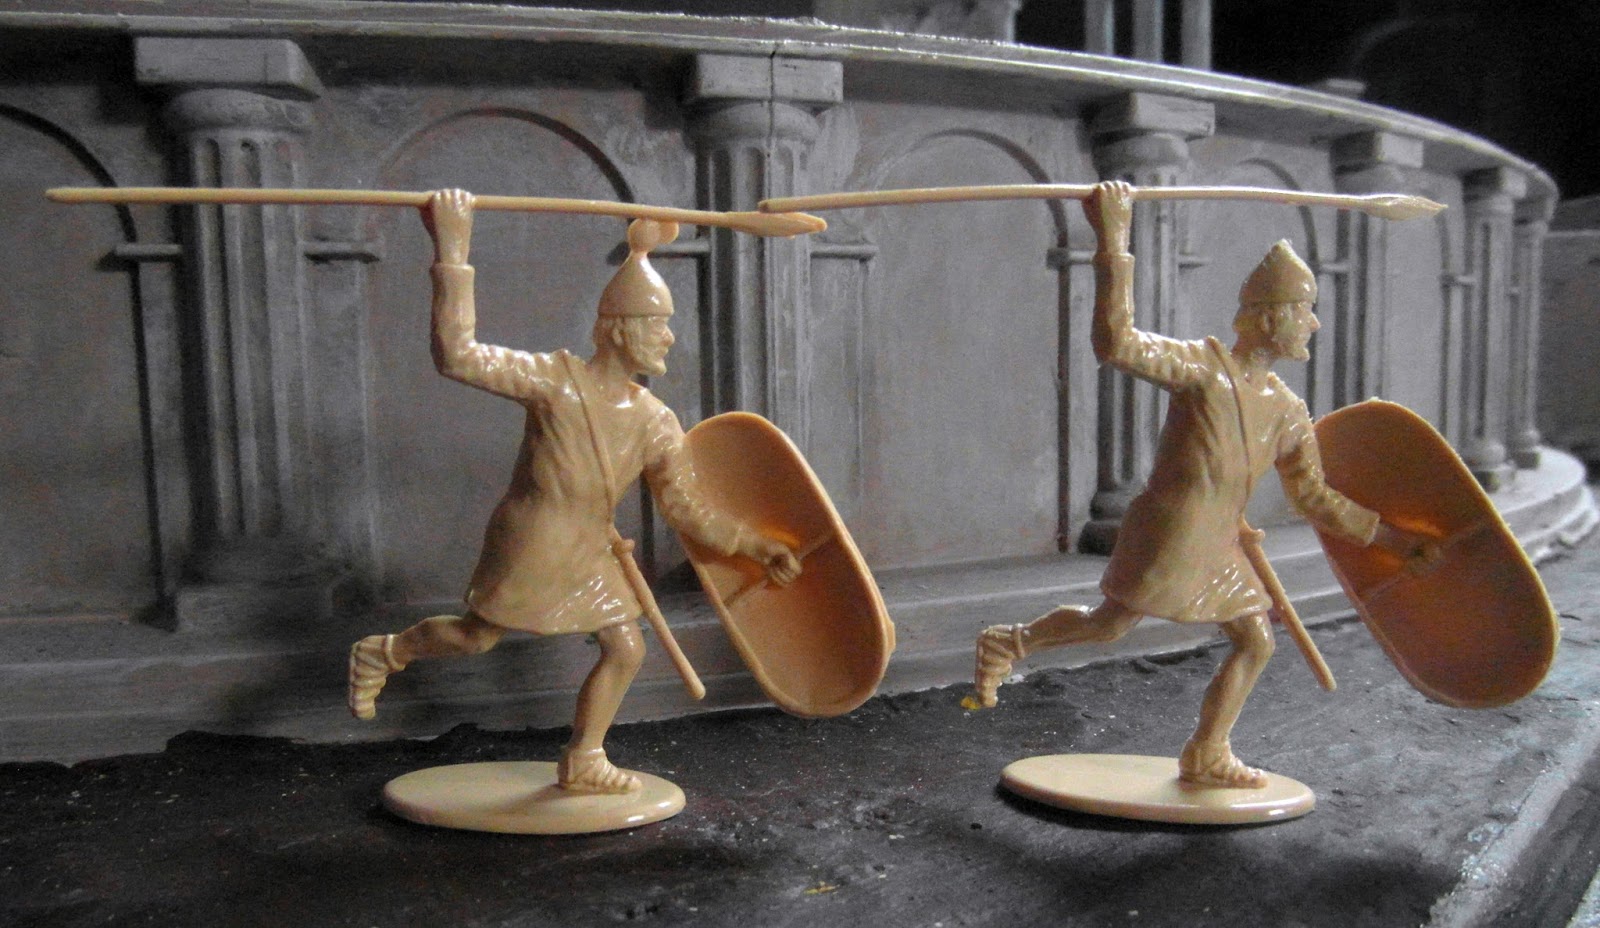
The two figures I'm currently interested in are the two helmeted ones, as shown on the front, with their red shields and long bronze spine.
Once more I've paired the two similarly dressed figures for use in the arena to be used as a spearman and a duplicate for when he has dispensed with his spear and drawn his sword. 
Even the line illustrations of the two figures
 don't give cause for concern as there seems little conversion work to do on either figure and all that will remain to be done is to re-position their stances a little to give at least some semblance of variation.
These of course being very lightly armed will be used as velites in the animal hunts (normally the first session in an arena's day (and in my games too- if they ever get really going on a regular basis).


The original on the left and plume-less on the right
 So where's the problem then?
Mr. Spearthrower (Thruster ?) has what appears to be a small plume atop his helmet,which is probably just sprue to enable easier moulding and was fairly easily removed, but his shield has none of the lovely veriucal spin on it as shown on the front box art - even the small drawing showed the pose on the left, thus hiding the omitted spine.

The Spineless Spearman
Original swordsman on the left, and 'converted' one on the right

His sword armed counterpart on the other hand does have the spine on his shield - as illustrated.
So for uniformity between the two figures (spear and sword armed) I got to cutting away the spine and the supporting pieces to the centre boss on the sword-armed version. This a more or less gave a suitably similar figure to the spear armed one, save for the very nicely done shield edge, which of course had to be cut away too as Mr Spearman didn't have one on his shield!


Re=positioned Spearman
  The spearman took little to no time cutting his his plume off and slightly re-positioning his spear-arm and leg (there's only so much that can be done) and were duly based up.
You'll probably notice the bases are cut-up plastic 'credit' cards and are great for my purposes. 
The quillons on their sword hilts were also cut back to more represent the gladius (- and as I thought the ones present looked odd)
The swordsman took a little while longer to finish off, especially after I stabbed my index finger on my left hand and slashed the corresponding one on my right hand a day later (the latter not hobby related! - for a change).
There wA A litttle more that could be done re-positioning the sword arm, but not much.

And in case you're wondering where the fourth figure of the group is - he went awol at the time of the photoshoot (but now found).. These will have their bases finished and painted in the coming week (or more) and I'll be taking another look at adding nets to my retiarii 0 which is all I managed to do to them in the last week too (i.e. look at them).

That's it then for this week.